
Greenhouses
The greenhouses are 72' x 30' structures. The south one was covered by a black shade cloth, which we removed in January 2014 and replaced in July with a 6-mil poly film and a 26'-wide shade cloth (much lighter in weight than the original black one) on top of the film. There are two big fans, one at either end, that keep the temperature bearable on a sunny summer day, but it would use a lot of power to keep them running all day for three months in order to grow things. A possible solution is a swamp cooler, using captured rainwater stored as described below.
Greenhouse use for growing plants in this desert region faces three challenges: keeping it warm enough in the winter and cool enough in the summer, and conserving water.
The S greenhouse in the foreground is equipped with a gas heater (visible on the platform behind the sign). I don't want to use it, except in an emergency. Heat loss during winter nights and cloudy days will be over the whole surface of the film cover. There are techniques for reducing loss (double walls, bubbles between the walls, partial earth burial, interior canopies for covering crops at night), of which I may adopt the last one as the least elaborate and expensive.
Two attractive ways to conserve water are to harvest and store rainwater from the greenhouse cover, and to adopt a low-water-consuming growing technology such as aquaponics. If captured water is stored inside the greenhouse, in black-painted tanks, it will absorb heat from solar irradiation in the daytime and moderate the heat loss from the house at night. So in March to May 2014 we built concrete tanks along the S and N sides, before re-covering the greenhouse. The tanks were poured in 8' sections.


Many of the seams between sections have slow leaks. There appears to be a slightly larger leak at the NE corner of the N tank. In September 2014 we received a 7/8" rainfall one night and I fed water from the overflowing poly tanks into the greenhouse tanks through hoses. The S tank filled to within 1" of the brim. By morning it had subsided by 6", or about 500 gal, by leaking onto the greenhouse soil. So as soon as we depleted the contents, the tanks were patched with a product called Thoroseal.
It turned out that this product isn't any good at sealing cracks (and that it doesn't claim to be, either). In spring 2015 I tried another product called Xypex, but because of the instability of the tanks on soil that can become wetted or dried, finally decided to buy custom-manufactured liners for them.

These tanks are 67' long, 3' deep, and 2' wide internally, with 3" thick vertical walls and 4" thick floors reinforced with welded fencing wire, and sections joined with 1/2" rebar as shown in the photos. So they'll hold 3000 gal each when full. There are 1.5" PVC drains with hose bibs, facing into the greenhouse, at both ends (but these drains were installed before the liner and do not extend through it. Tank draining is now via submersible pump). The outsides of the tanks are painted with flat black exterior latex paint.

The 4" gutters are hung on standard gutter brackets on 4" fascia boarding clamped with pipe brackets to the greenhouse hoops. They slope from the centers to both ends, 2" in 33'. The outlets from the gutters into the tanks, placed near all four ends, are made of 1.5" ID PVC, led through the fascia boards into the sides of the gutters and caulked where they feed through the gutter sides. I made debris guards out of aluminum mesh from some gutter-guard material and placed them on the gutter outlets (as shown) and on the tank outlets (not shown).
The tank cover is 6-mil poly sheeting and was installed to impede algal growth and accumulation of insects and dust. The hanging brackets are 1" x 2" lumber, and the covers are stapled to their undersides through strips of 2"-wide woven plastic reinforcing strapping -- the same material used to strap down the greenhouse cover between hoop pairs.
Rainwater is led from the film into the gutters by 6" wide x 3' long strips of film (trimmings from the main film) taped to the main film and overhanging the inside wall of the gutter. Without these, it would run down behind the gutters and be lost.
Since the half-house draining into each tank is 15' wide and the tank 2' wide, 1" of rain falling on the cover puts 7.5", or 600 gal, into each tank. As with my other water storage, a monsoon exceeding 5" will fill the tanks to overflowing -- neglecting depletion by irrigation or evaporative cooling use.
I wondered, without doing any calculation, whether the 4" guttering and the 1.5" outlets would accommodate a cloudburst without overflowing/backing up. They do very easily. Indeed, I can feed the overflows from my full poly tanks into the gutters during rainstorms, rather than letting them run out on the ground.
Growing stuff in the greenhouse
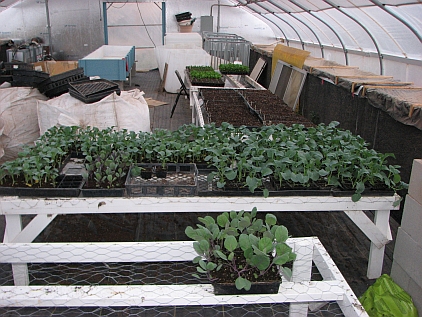
In spring 2016 I finally started using the house for growing plants. The plan is to sell vegetable plants this spring. In the foreground is Brussels sprouts; behind it, broccoli; then flats planted with tomato and pepper, not yet appearing, and behind that, lettuce, arugula, dill, and cilantro. The blue-painted box in the rear is intended to become an aquaponics grow bed; the white sacks nearer the camera contain media.
Every year since I have started plants in the hoop house, but never grown anything in the summer (too hot) or winter (too cold).
Double-filming the hoop house
In 2018 or 2019 I adopted an insulation technique invented at one of the universities, involving installing two films and inflating the air between them with a low-volume fan running constantly. I also insulated the ends of the house with foil-faced chipboard and the W overhead door with 1" rigid foam. I constructed an entrance lock on the E end so that there was both a sliding door and a hinged door within. I then monitored the low temperatures in the house all winter.
The results were discouraging: the interior low temperatures were only a few degrees higher than the exterior ones. The house could be used for extending the growing season at both ends, but would not be productive in midwinter, and would certainly not accommodate an aquaponic setup without auxiliary heating, which I did not want to use. Eventually also the connection of the fan to the inner film failed and leaks developed somewhere, probably from the films flapping in our high winds, so that inflation was no longer possible. I then stretched the films as tight as I could so that they would at least provide a roof for as long as possible without beating themselves to death.
The only greenhouse that will allow year-round gardening in this area is an earth-sheltered one with a well-insulated N side and top, and some provision for circulating ground-source heat through it. I have begun preparing such a house on the model of the "Greenhouse in the Snow" as of spring 2020, to be erected on the site of a second hoop house that I had never re-covered and that I sold to someone for dismantling and removal.er
